

personalHTTPtunnel
Private & free secure HTTP tunnel
Setup your personal, private & free secure HTTP tunnel solution
• You can run the TunnelServer on an Android device (low power consumption) or standalone on a PC or other Java enabled device
• Tested on Raspberry Pi
• Access your home network from everywhere in a secure way – including HTTP, FTP, UPnP, remote desktop, Socks and any other TCP or UDP based service!
• Wake up PCs via WakeOnLan in your home network by sending Magic WOL packages
• Open only 1 port (HTTP) on your home network to enable access to all services
• Have full internet access from behind a firewall
• Have your own private HTTP tunnel server
• No need for static IP address – No need for any 3rd party DYN IP solution
personalHTTPtunnel Download
How does it work?
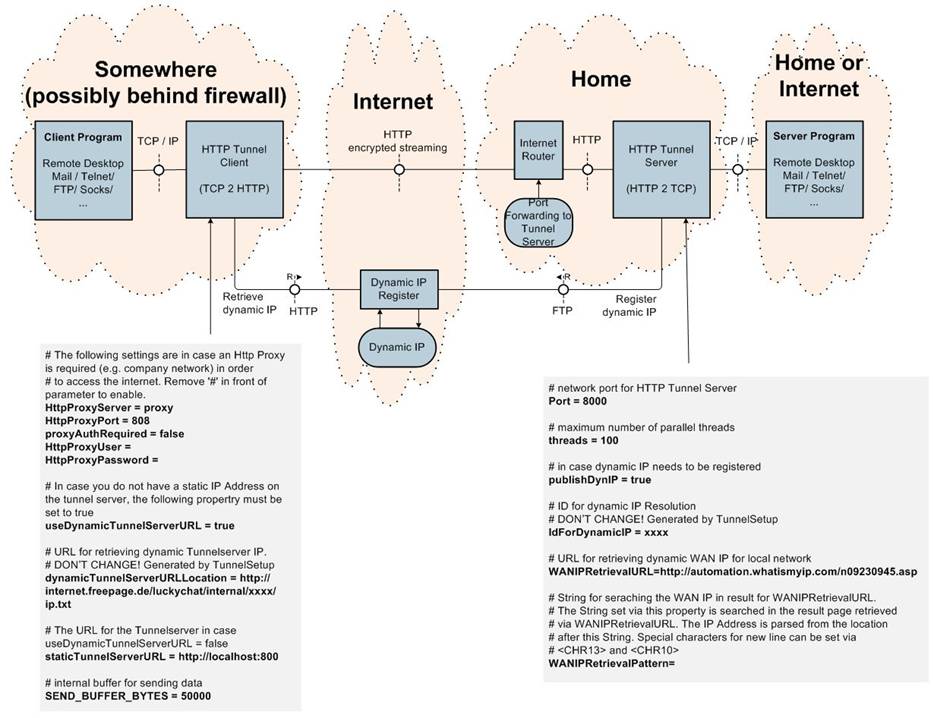
Private HTTP tunnel solution has a client part and a server part.
The client part is installed on the device which is used to access the internet or home network. The server part is installed in your home network.
The client part translates the TCP protocol to HTTP and sends the data (encrypted) via the HTTP protocol to the Server Part. The server part translates HTTP back to TCP and connects to the final destination.
The result is a HTTP tunnel between the client part and the server part. All data is sent encrypted between the client part and the server part. Client and server part need the same encryption keys in order to connect each other.
How can you use it?
You can use HTTP tunnel solution to connect to your home network from anywhere to any network service by having only the HTTP port open – no need for example to open the remote desktop
port when you want to connect via remote desktop. You are safe from any attacks and port scans!
As the HTTP Protocol can bypass any restricted firewall, you can use HTTP tunnel solution to connect to any internet service even from behind a firewall. Just use your home network as internet gateway!
NOTE: In case you want to use HTTP tunnel solution to bypass the firewall at work, check with your bosses first as this might be forbidden in your company.
How does it work with dynamic IP address?
As most of us do not have a static IP address in the home network, there is the need to tell the client part on which dynamic IP address the server part is running currently.
The server part publishes the IP address in an encrypted manner to a predefined web host in the internet.
The client part accesses this host in order to retrieve the dynamic IP address of the server part.
How to setup and configure HTTP tunnel solution?
Java runtime needs to be installed on devices for running server and client
unzip tunnelsolution.zip package into installation folder
start setup.bat from within the installation folder (in case of non Windows OS, please adopt batch file according to your platform)
Generating Key! …
Register for dynamic IP Resolution…
Writing Tunnel Client Configuration …
Writing Tunnel Server Configuration …
Writing Key Files…
Tunnel setup completed successfully!
See documentation for next steps!
The previous procedure generates the key files for client and server (based on your mouse moves) and registers your installation for publishing a dynamic IP. Client and server configuration files (server/TunnelServer.properties and client/HttpTunnel.properties) where generated as well. The generated values must not be changed. Other, non generated values might be changed.
By default the tunnel server WAN IP (which needs to be registered in case of dynamic IP) is retrieved via automation.whatismyip.com. Nevertheless the preferred way is to retrieve this IP via the local router if possible. In case this is possible with your router, please adopt TunnelServer.properties (WANIPRetrievalURL, WANIPRetrievalPattern) accordingly.
On your router configuration, assign a static local IP address to your device running the tunnel server.
On your router configuration, open port 80 (HTTP) and configure a forward to the device running the tunnel server and tunnel server port (8000 by default).
You can start the server part from the server folder via start.bat (in case of non Windows OS, please adopt batch file according to your platform). Check if it starts correctly and that IP registration works well.
You can test the client by running
“start <local port> <remote host> <remote port>”
from the client folder. This will forward all connections to <local port> via HTTP tunnel to <remote port> on <remote host>.
You can start an HTTP proxy via httpproxy.bat (with this you could use your home network as HTTP proxy from anywhere)
You can start a Socks 4/5 proxy via socks.bat
You can start a FTP proxy via ftpproxy.bat
You can start a UPnP proxy for connecting your media servers in the tunnel server network via UPnPProxy.bat
A reverse proxy for connections from the tunnel server network into the tunnel client network can be started via
“startReverse <local port> <remote host> <remote port>”
This requires setting “allowRemoteServerProxy=true” in HttpTunnelServer.properties.
You can send Wake On LAN (WOL) Magic Packages to PCs in your network in order to wake them up. Use command
“SendWOLPackage <IP> <MACADDRESS> <PORT>”
for sending a magic package into your home network. <IP> might also be a broadcast address in your network (e.g. 192.168.255.255)
Copy the client package to any device you would like to use for connecting via HTTP tunneling. Behind a firewall you might need to set the HTTP proxy configuration within HttpTunnel.properties.
If you want to run the tunnel server on your Android device, follow the steps described in the server folder.
